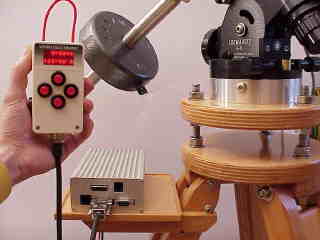
ASTRO ELECTRONIC
Dipl.-Ing. Michael Koch
Raabestr. 43     D-37412 Herzberg     Germany
Tel: +49 (0)5521 854265    Fax:  +49 (0)5521 854266
www.astro-electronic.de       e-mail
Informationen zur FS2 an den Losmandy G8 und G11 Montierungen
Informations about the FS2 with the Losmandy G8 und G11 mounts


Sie können die FS2 mit den original Losmandy Motoren verwenden. Leider ist aber die Getriebe-Untersetzung bei diesen Motoren sehr groß, so daß die maximale Schwenk-Geschwindigkeit bei der G11 nur etwa 32-fach ist (50x bei 30V, 64x bei 40V), und bei der G8 etwa 64-fach (100x bei 30V, 128x bei 40V).
Sie brauchen neben der FS2 nur noch passende Anschlusskabel für die Losmandy-Motoren.
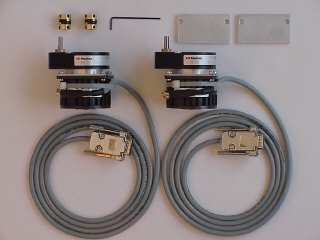
Wenn Sie aber Wert darauf legen daß die Montierung schnell schwenken soll, dann müssen Sie bessere Motoren verwenden. Im folgenden wird ein komplettes Set beschrieben, mit dem Sie auf einfache Weise Ihre Montierung umbauen können. Das Set ist wahlweise mit oder ohne Motor-Gehäusen lieferbar.
You can use the FS2 with the original motors supplied by Losmandy. Unfortunately the gear reduction ratio is very large with these motors, and that's why the maximum slewing speed is only about 32x with the G11 (50x at 30 volts, 64x at 40 volts), and about 64x with the G8 (100x at 30 volts, 128x at 40 volts).
Besides the FS2 you need only suitable cables for the Losmandy motors.
If you want faster slewing speed then you need better motors. On this page you'll find a complete kit with all parts required to modify your mount.

Motor-Set für Losmandy G8 und G11Montierungen

Dieses Set enthält alle benötigten Teile um eine Losmandy Montierung auf bessere Motoren umzubauen:
2 Schrittmotoren ESCAP P530 mit 12:1 Getriebe, mit Kabeln
2 Wellenkupplungen 5mm / 6.35mm
2 Innensechskant-Schlüssel zur Montage der Motore und Kupplungen
2 Adapterplatten zur Montage der Motoren

Motor kit for Losmandy G8 and G11 mounts

This kit contains all parts that are required for modifing a Losmandy mount with better motors:
2 Stepper motors ESCAP P530 with 12:1 gears, with cables
2 Shaft couplings 5mm / 6.35mm
2 Hex keys for installing the motors and shaft couplings
2 Adapter plates for motor mounting

Hier sehen sie den ESCAP Motor P530 mit 12:1 Getriebe an der Losmandy G11 Montierung

Here you see the ESCAP P530 motor with 12:1 gear at the Losmandy G11 mount

Neben dem Motor-Set benötigen Sie nur noch eine FS2. Die maximale Schwenk-Geschwindigkeit hängt davon ab, welche FS2 Version Sie verwenden:
 
FS2 Version: G8 Montierung G11 Montierung
12 Volt 480x = 2°/sec 240x = 1°/sec
30 Volt 960x = 4°/sec 480x = 2°/sec
Mit 40V Spannungswandler 1200x = 5°/sec 600x = 2.5°/sec

Besides the motor kit you need only a FS2. The maximum slewing speed depends on which FS2 version you use:
 
FS2 version: G8 mount G11 mount
12 Volts 480x = 2°/sec 240x = 1°/sec
30 Volts 960x = 4°/sec 480x = 2°/sec
With built-in 40V converter 1200x = 5°/sec 600x = 2.5°/sec

Das ESCAP Motorkit ist auch mit CNC-gefrästen Aluminium-Gehäusen lieferbar.
 

The ESCAP motor kit is also available with CNC machined aluminium housings.
 

Wie man die CNC Gehäuse montiert:

-- Entfernen Sie die alten Motore und Wellenkupplungen.
-- Montieren Sie die neuen Wellenkupplungen auf die Schnecken-Welle und auf die Motor-Welle, aber ziehen Sie die Schrauben noch nicht fest.
-- Befestigen Sie die erste schwarze Platte und den Motor mit den zölligen Innensechskant-Schrauben. Vergessen Sie nicht das Kunststoff-Mittelteil in der Mitte der Wellenkupplung.
-- Justieren Sie die Wellenkupplungen und ziehen Sie die Schrauben fest.
-- Befestigen Sie das Mittelteil des Gehäuses mit 4 Schrauben.
-- Befestigen Sie das Deckel (mit Steckverbinder) ebenfalls mit 4 Schrauben.

How to install the CNC housings:

-- remove the old motors and shaft couplings.
-- install the new couplings on the worm shaft and on the motor shaft, but do not fasten them now.
-- install the first black plate and the motor, using the 6-32" socket cap screws. Don't forget the black plastic part in the middle of the shaft coupling.
-- now adjust the couplings on the shafts and fasten them.
-- install the big black middle part of the housing with 4 screws.
-- install the second black plate with the connector with 4 screws.

Preisliste       Price List